
E1.2: Exploring Diffusion Models: From Concept to Code in Text-to-Video
What are diffusion models, how are they being built, and how can we create a video ourselves?

Welcome back to The Application Layer, for the second edition of our bi-weekly series that takes you into the heart of technological progress. Building on the previous edition, Unleashing the Future of Video Creation, in this edition, we’re diving deeper into the world of text-to-video generation with diffusion models - arguably, at the moment, the most promising models in terms of quality. While OpenAI’s Sora model is not open for the public yet, after this edition, you’re able to generate a video from your own text.
In this edition, we'll focussing on what diffusion models are, a brief explanation of the training process and finally show how you can use a pre-trained model to create your own video from a text prompt in Python. This hands-on approach will show you how accessible this technology has become for creators and developers alike.
What are these models?
Diffusion models, a subset of generative models, are designed to create new data that resembles the training data, such as producing unique human faces from a dataset of faces. They achieve this by gradually evolving from a basic, often normal, distribution to the complex distribution of the training data, using reversible steps. The process involves starting from a simple noise distribution and progressively transforming it to emulate the detailed features of the target data distribution.
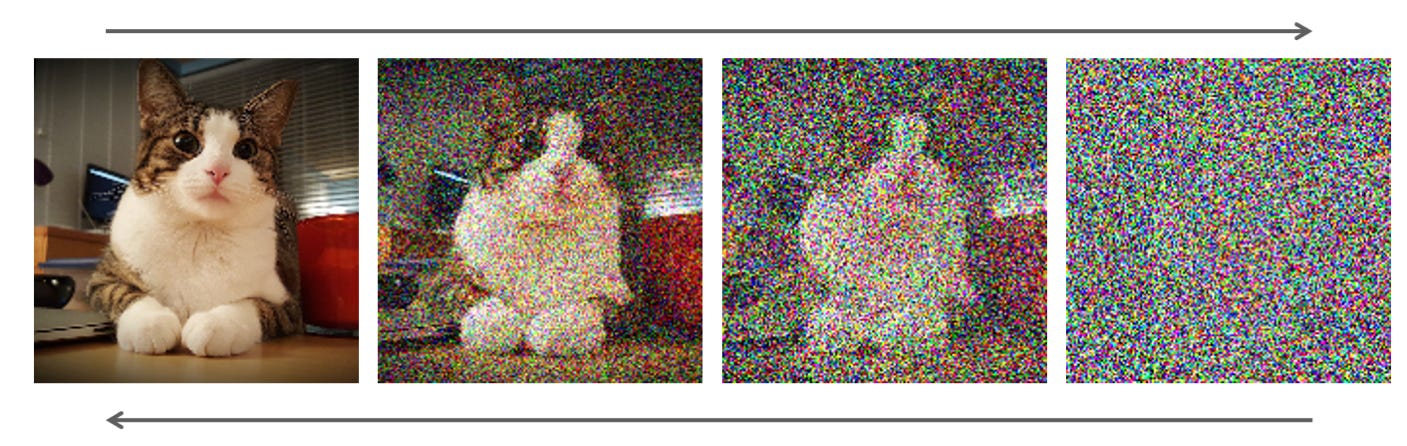
Diffusion model processes moving to and from data and noise
Source: Nvidia
Though models often blend various components, we generally categorise them into four main types:
Denoising Diffusion Probabilistic Models (DDPMs): These are the foundational models that simulate the reverse process of gradually removing noise from a signal to generate samples. Their uniqueness lies in their straightforward approach to model the data generation as a reverse diffusion process, primarily applied in generating images and other data types from pure noise.
Conditional Diffusion Models: Characterised by their ability to generate data based on specific conditions or contexts (e.g., generating images from textual descriptions), these models differentiate themselves by using additional information to guide the generation process, making them suitable for tasks requiring targeted output.
Latent Diffusion Models: These models operate uniquely in a compressed, latent space instead of directly in the data space (like a ZIP file reduces file size without losing information). This approach makes them efficient for dealing with high-dimensional data, distinguishing them by their use of latent space transformations for the diffusion process.
Score-Based Generative Models (SBGMs): These models share the fundamental principle of generating data by transforming a noise distribution into a data distribution but focus specifically on modelling the score of the data distribution. The score here implies the direction in which to adjust noise to more closely resemble the target data. SGMs use this score, or gradient, in a continuous framework (instead of discrete steps) guided by stochastic differential equations (SDEs), distinguishing them within the broader category of diffusion models.
These models, or combinations of them, have the ability to generate highly realistic images and videos, each employing a unique approach to manage and manipulate the diffusion process.
Training a diffusion model: A Quick Guide
Training diffusion models is a resource-intensive task often beyond the reach of individual devs. Yet, understanding the process from a high level provides valuable insights into how these models learn to transform text into video. Therefore, below the general steps of training such models:
Data Gathering and Preparation: Begin by gathering a good dataset, ideally with diverse examples. For diffusion models focusing on text-to-video, ensure your dataset includes video clips along with corresponding textual descriptions. Preprocessing steps like normalisation and resizing may be necessary to align with model input requirements.
Model Selection: Choose a diffusion model architecture that best fits your project, considering factors like the complexity of data and desired output. Setting up your development environment will involve libraries specific to your chosen model, such as PyTorch for computational graph management and model training.
Model Training: Training diffusion models demands robust hardware, typically GPUs, due to their intensive computational requirements. The training phase encompasses initialising the model, defining a suitable loss function to measure how well the model's output matches the target data, and selecting an optimiser to adjust model parameters and minimise the loss. Regular checkpoints are crucial for monitoring progress and facilitating model recovery.
Model Evaluation: Evaluate the model's effectiveness using a mix of quantitative metrics (such as loss reduction over time) and qualitative assessment (visual inspection of generated videos). Feedback from this stage is essential for refining model parameters and training approaches.
Implementation: Once satisfied with the model's performance, prepare it for deployment. This step may involve converting the model for compatibility with different platforms or optimising it for faster inference. Continually update the model with new data and insights to maintain and improve its performance over time.
If you want to train a diffusion model from scratch (to generate images), I’d recommend this tutorial (which uses a Butterfly dataset). Yet, generally, the best results, and with less hardware requirements, come from finetuning a base model on your own data. An excellent tutorial can be found here. However, it could also be the case that there is already a model in place for your need. That’s where inferencing comes into play.
Inferencing a diffusion model: A Coding Example
Inferencing is the phase where a trained diffusion model applies what it has learned to generate new data from given inputs, such as turning text prompts into videos. This process uses the model's knowledge to predict or "infer" outputs without additional training, showcasing the model's ability to create realistic and coherent visuals based on the initial textual description. We are going to use a stable diffusion tex-to-video model (a combination of a latent and conditional diffusion model) from the Hugging Face website. The aim is to generate a short video based on our own textual input.
Create your virtual environment
For Mac, create a new folder, navigate to this folder via the terminal and run the following:
virtualenv venv
source venv/bin/activate
For Windows, create a new folder, navigate to this folder via Command Prompt and run the following:
virtualenv venv
venv\Scripts\activate
If virtualenv is not recognised, you can install it using pip3 install virtualenv. If it still doesn’t work, you probably need to add virtualenv to your path.
Install the libraries
pip3 install diffusers transformers opencv-python numpy torchDo the imports
#imports
from diffusers import DiffusionPipeline, DPMSolverMultistepScheduler
from diffusers.utils import export_to_video
import cv2
import numpy as np
import torch
Initialise the pipeline
pipe = DiffusionPipeline.from_pretrained("damo-vilab/text-to-video-ms-1.7b", torch_dtype=torch.float32)
pipe.scheduler = DPMSolverMultistepScheduler.from_config(pipe.scheduler.config)
This code initializes a pre-trained diffusion model for generating videos from textual descriptions. The first line line loads a specific model trained to create videos based on input text, setting it to operate in floating-point precision for computational efficiency. Following that, the second line configures the model's scheduler, which manages the diffusion steps during video generation, ensuring the process aligns with the model's training configuration for optimal performance.
We use model damo-vilab/text-to-video-ms-1.7b made by Alibaba / DAMO Vision Intelligence Lab. Yet you can take any other model of your choice (and make some minor code changes). Important to know here is that we use a CPU instead of a GPU implementation. Therefore, everyone can execute the code on its own device.
Define your prompt
num_inference_steps = 25
prompt = "A panda eating bamboo on a rock"
video_frames = pipe(prompt, num_inference_steps=num_inference_steps).frames
Define your input in the prompt line. The video_frames line line triggers the model to start the generation process, ultimately producing a sequence of video frames that visually interprets the given prompt. You can increase the number of inference steps to improve quality at the expense of processing time.
Define the video properties
fps = 16  # Frames per second
height, width, channels = video_frames[0].shape[1:]  # Get shape from the first batch
vid_name = f"{prompt[:50]}" + " nis" + f"{num_inference_steps}" + ".mp4"
video_writer = cv2.VideoWriter(vid_name, fourcc, fps, (width, height))
This code sets the frame rate (in frames per second) for the video, extracting the height, width, and number of color channels for each frame from the first batch of generated frames. It defines the video codec (that manage how videos are compressed) as 'mp4v', a common format for video files. The Video Writer object is then initialized to write the video file.
Write frames to video
for batch in video_frames:
    for frame in batch:
        # Ensure frame is normalized and in uint8
        frame_uint8 = (frame * 255).astype(np.uint8)
        video_writer.write(frame_uint8)

video_writer.release()
print(f"{vid_name} done")
This code snippet normalises each frame in the video by scaling the pixel values of each frame to span the full range of 0 to 255, a common scale for digital images, ensuring compatibility with video codecs. Converting to 8-bit unsigned integer format specifies that each pixel's color intensity is represented by a value between 0 and 255, fitting the standard format for image and video files. It then writes each frame to a video file using OpenCV, finalises the video writing process.
What we get out is the following video:
Prompt: “A panda eating bamboo on a rock”
As can be seen, this video is short and not meeting production quality standards yet. You can increase the length by using a GPU implementation and play around with the number of inference steps to improve the quality. If not satisfied, try another model or consider finetuning a model on your own data. At the bottom of this post, other video examples can be found. For playing around with prompts without code (and, depending on your machine, probably higher processing speed), you can leverage the UI here.
To wrap up, this edition demonstrates how to leverage open-source diffusion models to generate video content, showcasing a practical application of such models. As the field evolves, we can expect the quality of these models to improve, potentially making open-source solutions a standard in the industry. This not only democratises access to powerful generative tools but also encourages innovation and collaboration in the development of high-quality video content.
The future is bright. See you in two weeks. Thanks for reading.
Prompt: “A pirate riding a horse”
Prompt: “A sunny beach with palm trees”
Prompt: “A dog on a surfboard catching a wave”
Prompt: “Spiderman bungeejumping from a tower”